This posting is about how to make HDD partition and format it in Windows system as my boss asking me to swap a new HDD for one of staf PC here regarding her HDD almost got problem maybe hardcore user hehehehe....
So, the make my job easier and safe, i google thru net to find out a easier method to make it.
And i found this article. So, copy paste here to keep sharing this information for all.
Introduction
In order to use a hard drive, or a portion of a hard drive, in Windows you need to first partition it and then format it. This process will then assign a drive letter to the partition allowing you to access it in order to use it to store and retrieve data.
If you would like more information on partitions you can read this tutorial:
Understanding Hard Disk Partitions
For this tutorial, my examples will be done from within Windows XP. These techniques will work, though, with Windows 2000, 2003, and the upcoming Vista.
Creating and formatting a partition in Windows
Before you can partition a hard drive in Windows, you must have installed a new unused hard disk, deleted an existing partition, or have some unpartitioned space available on an existing drive. In the example in this tutorial I will take the unused space from one of my hard drives and partition/format it. The steps shown here will work whether you are working with a brand new hard drive, deleting an existing partition and reusing it, or partitioning available space on an existing hard drive.
All hard disk management is done in the Disk Management Administrative Tool. Follow these steps to open this tool:
1. Click on the Start button and select the Control Panel option.
2. If in Classic control panel mode, double-click on the Administrative Tools icon and then double-click on Computer Management icon.
If your control panel is in the Category view, click on Performance and Maintenance, then click on Administrative Tools, and finally double-click on the Computer Management icon.
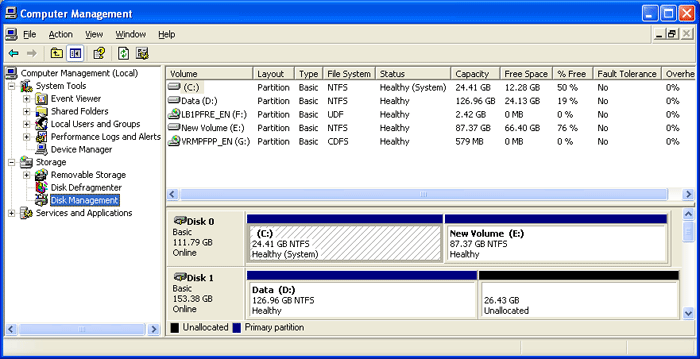
3. When the Computer Management screen opens, click on the Disk Management option under the Storage category. This will present you with a screen similar to the one below.
When you are in the disk management tool you will see a listing of your current hard drives and how they are partitioned. From the image above you can see that I have two hard disks installed. The first disk, Disc 0, has two partitions. One partition is a 24 GB NTFS partition that has been assigned the drive letter C:. The other partition on that drive is a 87 GB NTFS partition that has been assigned the drive letter E:. The other drive, has only one partition, the D: partition. The rest of the space, 26 GB, shows that it is unallocated and therefore can be used to make other partitions.
To make a partition from the unused space you would do the following.
1. Right click on the space listed as unallocated.
2. At the menu that comes up, click on the New Partition option.
3. You will now be presented with a wizard as to how you would like the partition to be created. At the first screen press Next.
4. At the following screen, determine if you need a primary or extended partition. For more information about these partitions you can read our partition tutorial listed above. Most people will be fine selecting Primary Partition. Select Primary Partition and press Next.
5. At the next screen you will be prompted to type in how much of the unallocated space you would like used for the new partition. In my example, my unallocated space is 26.43 GB, so I can choose to make a partition of that entire amount of only use half and save the rest for another partition. Regardless, of what you decide, you need to enter a size in the Partition size in MB: field, or stick with the default size, and press the Next button.
6. At the next screen select the drive letter you would like assigned to it, or use the default one given. When done, press the Next button. The drive letter that you assign here will be how you access the partition later.
7. In this step you will determine how you would like the new partition to be formatted. For the most part you are advised to use the NTFS file system. If you need a file system that can be readable by older operating systems like DOS, Windows 95, Windows 98, or Windows ME, then you should instead choose the FAT32 file system.
8. Type a name in the Volume Label field that will be associated with this partition or leave it blank.
9. Finally press the Next button and you will come to a summary screen. Review how the partition will be created, and if you are satisfied, press the Finish button to complete the creation and formatting of your new hard disk partition.
When the computer finishes creating and formatting the new partition you will be presented with the Disk Management screen again and will see that you have a new partition and drive letter on your computer. Now you can use that drive to start storing your data.
Deleting a partition in Windows
If you have existing partitions on your computer that you would like to delete in order to use its space for other purposes, then you first need to delete this partition. It is important to note that by deleting a partition you will lose all your data on that partition. With that warning given, let me give some examples of why you would want to delete a partition. Lets say that you have a 60 GB hard drive in your computer that was originally partitioned into a 20 GB partition and a 40 GB partition. You would like to install another operating system on your computer, but feel that neither partition is big enough on its own, and would like to instead create one partition using the full storage of 60 GB. The only way to do that would be to delete both of the existing partitions and recreate a new one using all the available space.
To delete a partition please follow these steps:
1. Click on the Start button and select the Control Panel option.
2. If in Classic control panel mode, double-click on the Administrative Tools icon and then double-click on Computer Management icon.
If your control panel is in the Category view, click on Performance and Maintenance, then click on Administrative Tools, and finally double-click on the Computer Management icon.
3. When the Computer Management screen opens, click on the Disk Management option under the Storage category.
4. Right-click on the partition you would like to delete and choose the Delete Partition option.
5. A confirmation box will come up asking if you are sure you would like to continue. If you press the yes button, all data on this partition will be deleted. If you are sure about deleting this partition, press the Yes button.
The partition will now be deleted and you can either create a new partition or exit the program.
--
Lawrence Abrams
Bleeping Computer: Hardware Tutorial
BleepingComputer.com: Computer Help & Tutorials for the beginning computer user.
Keep on sharing !!!!